Saturday, November 17, 2012

Riding in Style...for real this time!

It had to happen sooner or later, so I went ahead and gave it the ol' college try this afternoon.  I needed to get this thing running.  Or at least try to get this thing running.  Yesterday, I bolted the fender in place (it went so much easier this time around!) and had the jeep prepped and ready for hopeful action today.  I did not, however, install the horn or hook up the grill lighting wires...just in case that fender would be coming off again.
 
I tried the foot starter, and it spun the engine over, but it has yet to actually crank the engine to life... yet.  That has been added to the punch list.  I thought I would give it a go anyhow.  I wasn't too shocked or disappointed that it did not roar to life.  I popped in the Steady Eddie hand crank and began to turn the crank nut.  However, unlike my previous attempts, it would not give me any sign of life.  I double checked the spark plug connections as well as making sure all of the wires were running to their respective spark plugs.  Remember, the firing order is #1-#3-#4-#2 .  Yes, they were in correct order.  Next, I popped off the dizzy cap and checked for a spark at the points.  (turn crank shaft so points are in the closed position, turn on ignition and use insulated screwdriver to manually open the points)  Yep, spark is present- saw it but did not feel it!
 
Now I'm thinking that the spark is just coming too soon or too late.  I loosened the dizzy clamp and turned the distributor very slightly in a clockwise rotation.  I hand cranked it again, and again and then again...and BAM...she roared to life.  Well, roar might be an exaggeration.  She came to life, but I needed to give her lots of throttle to keep her going, but she sounded good AND SHE HAD OIL PRESSURE!
On initial start-up:  45 pounds of oil pressure!!!  Look at that, the gas gauge with the rebuilt ORIGINAL fuel sender is working, too.  Yes, that sound you hear is the tooting of my "meep, meep" horn.
At this point, I should have gone ahead and adjusted the distributor, but I was OVERLY anxious to get her on the open highway.  By open highway, I mean my half mile residential street that makes a circle.  I had to give her some throttle to keep her going, but she really sounded good.  I didn't think it would be any problem for the drive.  So, off I went in a smoke-screened flash.
 
She did run rough once I got out on the road, but I had already started so I might as well finish the loop.  I only got into second, so third gear is still undiscovered.  The funniest part was on the backside of the loop, I definitely heard the sound of something metal falling into the road.  I turned my head back, but could not locate the AWOL piece and nor did I have the confidence to stop the jeep out of fear of not getting it home...under its own power.  Upon arrival of the sanctity of my garage, I adjusted the dizzy while it was still running.  I retarded the spark a little bit and got it running very smoothly and without the help of the throttle at all!  Minor victory by me.  I still need to start it again and drive it once, no, scratch that...drive it LOTS more to make sure it is fine!
 
After satisfied with the dizzy adjustment, I recruited my kids and we went for a walk to locate the AWOL piece of jeep.  It was a Christmas Miracle in November- we found it!  Turns out it was my missing 7/16th wrench that has been "lost" for the last week! 
 
 
This was filmed by me while driving so it isn't the best quality!   I'll try to post a better video later.
And for the record...the new "old" seat cushions rode great! 
I guess they aren't that authentic feeling then.
 

Tuesday, November 13, 2012

Riding in Style-If I were riding. Oil Pressure Saga...

For a birthday present last month, my wife and inlaws teamed up to buy me a complete set of seat cushions. Their thoughts are solely for the passengers that might one day brave a ride in this vehicle.  They aren't exactly reproduction cushions, nor are they original cushions, either.  They are made out of WWII tent canvas and sewn into patterns from jeep cushions.  Evidently, there is a guy in Europe (Belgium, maybe?) that has a huge stockpile of WWII era tents and fabricates these cushions from that canvas.

All in all, I was very pleased with them.  They don't smell as good (or bad, if you ask Sarah) as the repro's in my GPW, but hey, these guys are 70+ years old...and do have their own odor!  They look good, as in old, which really fits the look of this jeep since I have been using so many original parts to complete this restoration and add to the fact that I left a magnificent assortment of dents, dings and rolls in the tub. 

Actually, I was pleased with all of the cushions except for one.  The back pad for the bench seat (in my humble opinion) needed one more row of stitches to make it sit squarely and not roll out from the bottom.  Maybe that is one that I will keep one eye on a lookout for an original one.  Maybe...

The other fun part for the cushions is that I managed to conjure up almost all of the needed original hardware to attach them to the chairs.   In the end, I needed to buy four screws and eight donut washers to complete the installation.  Luckily, I was able to place the new pieces in concealed areas where one would have to bend their necks to view.  

Original hardware (left) and the newer pieces (right).  The new screw is 1/4 inch longer. 
Cannot notice the length when installed...just the shine.

Passenger back cushion:  looking quite old!

Seat cushions secured!  I have the hip crash pads, but I need to straighten the backing panels before installing.

OIL PRESSURE SAGA CONTINUATION...

I've been continuing the quest to figure out why I lost and cannot regain engine oil pressure.  I removed the oil pump, check it's specs and the one part that seemed out of tolerance was the disc-like washer inside of it that is about the size of a .50 cent piece.  I replaced it with another and did a simple bench test.  I funneled oil through the intake port and spun the shaft until oil began to appear in the exit port.  At that point, I place my thumb over the exit port, blocking the oil and continued to spin the shaft.  The shaft immediately became harder to turn and tried to resist my sub-human strength.  Alright, pump seems to be good.  Thank goodness, because if/when I need to get a new pump, it will have to be modified to fit the engine.  Bubba appears to have broken off two of the three studs that mount the pump to the engine.  His repair was good, but he drilled out the broken studs, widened the hole that they screw into and re-tapped it for a wider bolt.  Now, when a new pump will be installed, it's stud holes will need to be bored outwards to accommodate the larger bolts.  No biggie, but just a bit of a hassle.
At this point, I must give props to my good friend David.  Again, from three thousand miles away, he set me on the right path to figure this dilemma.  He sent me a link on how to prime the pump.  I had done it once, twice and thrice, but he gave me a different method to try.  In the course of reading the link, it showed a picture of the flange of the oil pickup line and how it can warp.  I had known about this and even checked it...but not all of it.  I looked at the flange on the engine side of the line, not the actual flange on the pickup end!  I dropped the oil pan (again!), removed the flange and inspected it.  Sure enough, it had a subtle bend AND it was semi pitted.  I used an extra wide file and slowly, patiently filed it so it became flat and level.
Sorry for the blurriness.  The flat edge is resting on the flange of the pickup line.  Hard to see, but there is a small gap in the middle.  What you cannot see is all of the pitting.  This, even though a gasket sits between this flange and the flange on the engine, will not seal off completely.  When the pump begins working, it will only suck air through the lines and not the oil.  This was filed to a smooth, level surface.
After filing, I made extra sure to get ALL of the small metal shavings out of the pickup tube.  I found the most effective method to use my rifle bore cleaning tools to clear it of debris, followed by a thorough washing and then compressed air to remove all of the moisture and whatever microscopic bits that remained.

I mounted the tube back to the engine, installed the oil sump and then refilled with oil.  Again, I primed the pump and began hand cranking the engine.  And then there it was...OIL flowing out of the line that leads to the gauge!  Just to make sure, I popped the top off of the oil filter and continued to cranking.  More oil was splashing out of the inlet tube to the filter!

Oil issue is resolved.  However, I predict the next issue to be timing the spark from the distributor.  Here's why...the engine came to me with the dizzy in the wrong position.  Since the dizzy mates with the end shaft of the oil pump, I figured now would be the appropriate time to remove the distributor and position it in the same fashion that the technical manuals show...you know, since I already had the oil pump sitting on my workbench.

To do this, the engine needs to be at TDC #1 on the compression stroke. I popped tappet cover off of the side of the engine and got number one valves "on the rock" so they would both be closed immediately after #4 finishes its rotation.  I checked the flywheel and the flywheel marks showed in the window.  The dizzy goes in with the rotor pointing to approximately 5:30.  The wide end on the  tip should be to the left with the vertical separator pointing at approximately 11:30.  It will mate with the wide end on the oil pump.  The oil pump slides in from the bottom, mating with the gear on the cam shaft.  Dizzy goes down from the top mating with the oil pump.  Everything went together so well, I figured I did it wrong.  So, I undid it two more times and every time it went smoothly.  Well, I figured I've got it right then.

Next step was to check for the spark at the points.  I attached the leads to the battery and flicked the switch "on".  I slowly turned the dizzy counter clockwise until the points just began to open and I saw a spark flash.  I then tightened the dizzy in place.  However, I'm thinking I'll probably have to fine tune it a bit more once I actually get the engine started.  While I was spinning the hand crank looking for my oozing oil, I did catch a glimpse of the rotor and it was spinning around inside the distributor, so that confirmed that the dizzy had been mated with the oil pump.

The wider side of both the distributor and oil pump shafts are on the left. 
The male part of the dizzy (left) plugs into the tip of female oil pump (right).
Note, these are not the actual units that were pulled from the jeep.
After I installed the originals, I remembered that I should have taken a picture!

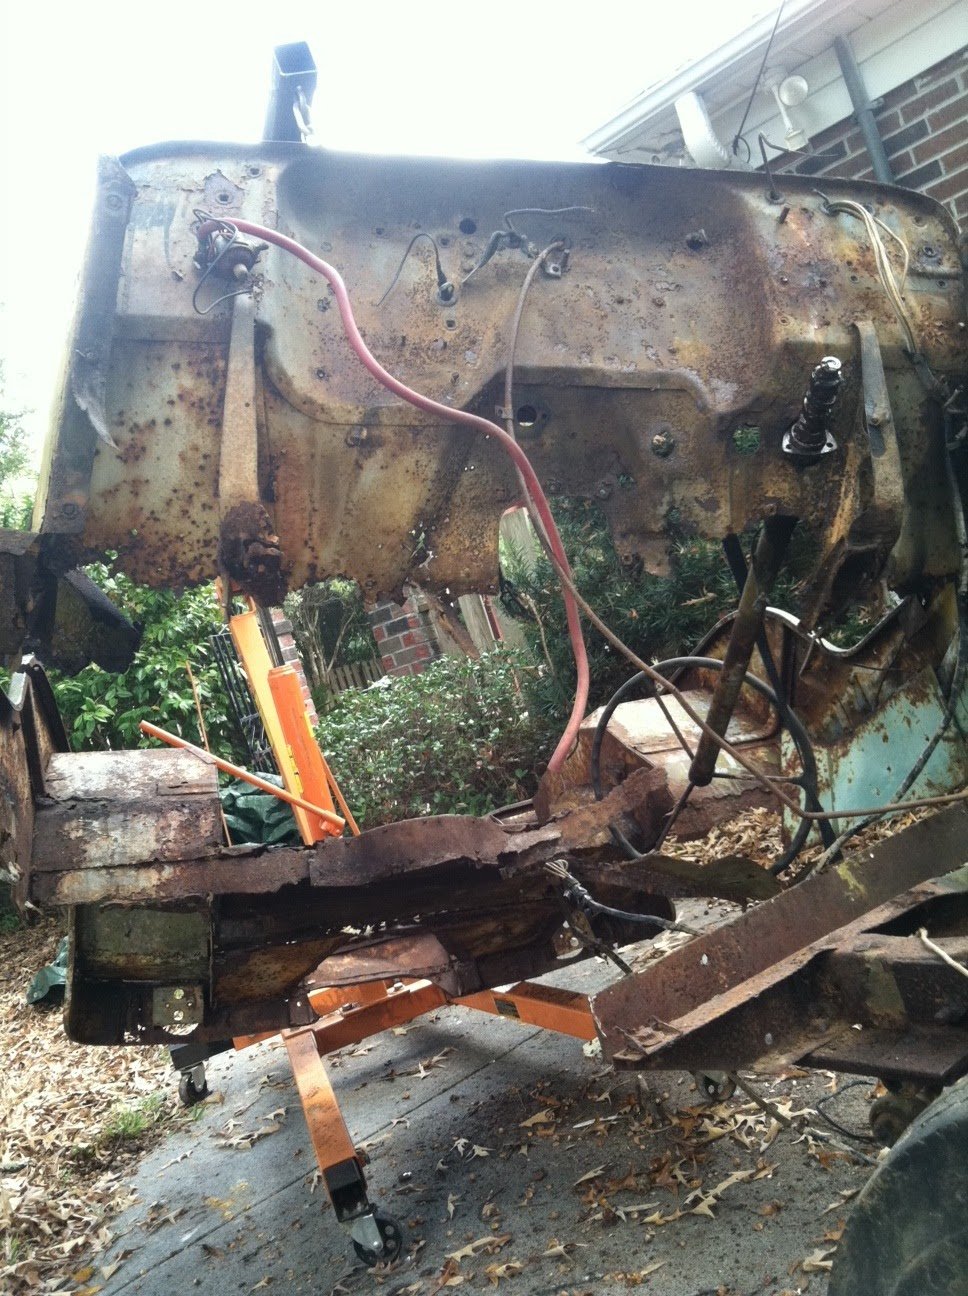
On another front...here's a bit of a teaser for what's to come:  JEEP #2!  This is the one where I will use the frame from one '44 MB and mate it with the tub of a second '44 MB.  I'm thinking for this ordeal, I'll be starting a second blog.   Supposedly, this will be the one I sell.  (That's exactly what I said about the last one!!)

Houston, we have lift off.  For sale, as is.  Ran when parked.

Just a bit of rust-through.  Salvageable?

Saturday, November 3, 2012

Reflectors are Flecting

So, I notice it has only been a month since my last post.  Shame on me.  Truthfully, I am running out of exciting, dirty things to write about...with this jeep.  I have had two hiccups along the "Road to Rebuild" (was that a Bob Hope/Bing Crosby movie?) in October, though.  I'll delve more into that in a moment.  In the mean time, check out a fun, simple reflector restoration.
 
The jeep has four reflectors mounted on the rear corners of the tub:  two on the sides and two on the rear.  My reflectors were all grungy and faded, so I disassembled them, cleaned them up and with two of them, I replaced with new red reflectors.  I haven't been able to procure NOS (new, old stock) reflectors, so I settled for (yes, it REALLY pains me to state this) modern reflectors bought cheaply from the Tractor Supply store.  I figure now that I've got the parts cleaned, I can always easily disassemble and reconfigure with NOS reflectors...if we ever cross paths.
 
Here is what I started with after a little date with the wire wheel.

Backside:  a bit rusty, but definitely serviceable.

Removing the lens:  I used a plastic pipe, cap and press.  The pipe was slightly smaller in diameter so I would press a bit on ones side, and then move the pipe to press in another area.  Working slowly and patiently helps the process...as does a squirt of penetrating oil on the back side.

The lens, the cap and the housing.  The cap just pressed out of the rear of the housing.

Cleaned and primed.

Painted OD.

Assembly.  The lens is centered in the housing with a rubber gasket on it's rear.
 The cap was just pressed back into place.

Three of the four reflectors were done.
 The fourth reflector, an original one, will be swapped out one day with one of the replacements.  It still has a thin layer of something unknown across it.  I need to figure out how to clean it first! 
Passenger side installed!
So that was the easy peasy fun part.  The hiccups occurred when I thought I would take the jeep out for a joy ride.  The first (and only) time I drove it, I had a temporary gas tank strapped to the side of the jeep.  Now, I wanted to fill the actual tank with gas and make sure all of the fuel lines and fuel filters (I have two- an in line and the original firewall mounted filter) worked.  Well, I double check all of the lines and then poured 5 gallons into the tank.  I disconnected the line at the firewall filter and sucked and puffed and discharged enough hot air that something should have happened...but nothing did.  I wrapped the line with a towel and wedged it into my shop vacuum...still nothing.  In the end, it turns out that the intake line deep inside the tank was clogged.  I drained the gas, removed the tank and set about unclogging the clog.
 
The clog occurred just after the 90 bend in the internal tube.  Coat hangars and copper wires didn't do a darn thing. Compressed air and high pressured water didn't do the trick, either.  I needed something flexible, yet with drill power like a plumbing snake.  Unfortunately, I do not think they make them that tiny.  In the end, I used a broken speedometer cable attached to a power drill.  PROBLEM SOLVED!
 
I reconnected all of the fuel lines and installed the tank.  I was now able to get fuel to the carburetor!  Great!  I installed a new battery and the jeep screamed to life immediately...just like it is supposed to!  I shoved the camera in Sarah's hands so she could film the ride from the rear seat and backed out of the driveway.  THAT'S WHEN I NOTICED HICCUP #2:  ZERO OIL PRESSURE.
 
I immediately shat myself and then slammed it into first gear.  1.5 seconds later I shut it down in the safety of the garage.  I disconnected the oil gauge line...and found nothing...no oil.  I hand cranked the jeep hoping to witness a geyser spew from the open line....nothing.  I shot some compressed air through the line and heard it come out into the oil sump.  I removed the sump tank and recleaned the oil pick-up line.  It looked alright, but I cleaned it anyhow, but I still can't get oil to flow.  I re-primed the pump...still no oil flow.
 
Currently, I have disassembled a second pump from my parts stash and am cleaning it up.  So far, it checks out to be within tolerable specs.  My plan is to 1. remove the existing pump from the engine and inspect.  Hopefully I will find something out of the ordinary.  If not, #2 will be to install the second pump and give it a go.  #3 could be buying a new pump.  We shall see!  I'll report back when I know something!
 
...until then, I'll be parked in the garage enjoying some vibrant reflectors!