Saturday, January 28, 2012

That "F"ing Rear Axle...the SEQUEL!

Jack and I were challenging each other to different contests that were quite similiar in fashion to the World's Strongest Man competitions.  I was losing the battle when I came up with "axle curls."  Well, I couldn't do that so I went with a dead lift on the rear axle.  I got it up and realized how much gravity was working against me so I chucked it on the work bench.  It made a perfect landing so I decided to open it up, replace the seals and check the bearings, races and cones (those last three are basically little ball bearing gizmos that help the wheels turn).

Dismounted rear axle about to be opened up.

To be honest, the only reason I took this picture was so I could remember
exactly where to reattach the brake hose (upper left with blue tape).

Axle shafts removed, brakes hubs off and rear cover plate catching old nasty oil.

Close up of the internals.  My first bit of negative suspicions arised when I noticed the markings on the differential bearing caps had been switched.  The bearing caps are the two crescent shaped pieces bolted in by the two massive "F" marked bolts.  Each cap has two bolts that are (FUN FACT) torqued to 38-42 lbs.
Like I mentioned in the above caption, the bearing caps were switched.  There is two lines of stamps on each cap.  "GP 4224" is stamped on the top line.  The second line has a "2" and then a few other marks.  The "2" is stamped sideways on one side and upright on the opposite side.  There is a coordinating stamp on the unpainted surface surface where the cover plate sits.  The sideways "2" should be with the other sideways "2" and likewise with the upright "2's".  Well, these weren't with their partners and the manual is VERY specific about not switching these around.  The differential (the massive gear) and the pinion (smaller gear unseen in the rear) have special shims that keep it placed to within thousandths of an inch and must be precise.  Goofing with the bearing caps can jack this up.  OK, enough of my soapbox preaching.  Lets move on...

I pulled out the differential so I could get a good look at the axle shaft seals.  I was fairly certain that these suckers were about 70 odd years old and had enjoyed a fullfilling life.  Time to pull them out and replace with new.
Differential out and bearing caps positioned so I could recall how to install.

Here is a good look at the pinion gear.

The oil seal for the longer axle (driver's side) shaft sits immediately at the entrance to the tunnel.

I have already "popped" the old seal from the short (passenger side) out of position.  I used a 40" steel tube that was hanging out.  The tube will actually serve a greater purpose later on in the restoration. 
Hopefully I will remember to tell you about it when the time comes!
I installed the 40" tube through the length of each axle tunnel and gently tapped it with a hammer to knock the seal loose.  Prior to installing it, I ground the lip of the tube down to make a smooth curved surface.  I did not want to make any scratches inside the tunnel.  Once the old seals were out, I place the new ones in place.  I used my largest socket (3/4, I think) to tap the new seals in place.  The socket fit well inside the lip of the seal while I tapped it evenly into the entrance to the tunnels.

Next, I needed to remove the pinion flange and install one more oil seal.  This seal will sit behind the pinion.  Luckily, the pinion and its shims did not need to be removed in order to set the new seal in place.
Fancy little "F" mark on the flange to the pinion drive. 
To get the old seal out, I had to get a bit inventive.  I drilled a hole through the seal and installed a screw.  Then using the leverage that I learned from Curious George cartoons, I used a crowbar perched on the top of the pinion to pull the old seal out.  Yes, I was careful not to use brute force.  Despite the tools used, it was quite the finesse job.
Tools of the trade:  old seal on the ground, new seal just sitting in place and the crow bar is just hanging out.

This is the back end of the oil slinger that sits behind the seal and it, too, has a very prominant "F".  I effing love the F's.
Me being me and thinking the process was coming along too easily, I opted to wait to install the new seal "just in case I needed to adjust the pinion depth."  So, I moved onto the brakes.  They were pretty straight forward to install.  Everything was being replaced with new parts.  The major part to insure done correctly is to have the larger brake pad positioned to the front and then the smaller pad sits in the rear of the drum.  And yes, I did NOT eff that up.
Just a reminder of what it looked like when I opened it up two weeks ago.

Clean and new.  Longer brake pad on the left, which would be towards the front of the jeep.
Both sides done!  Well, at least the brakes are in place.

Close up of the passenger side.  Both sides still need to be fine tuned and adjusted,
but that cannot occur until the brake drum has been installed.
With the new brake shoes in place, I now needed to get the drums back on.  However, I needed to pack the bearings full of grease and install two more oil seals.  Oh, and for what its worth, if you remember that cool "F" marked seal...I was able to save it.  It came out in one piece.  Come on over and I'll show it off to you.  Seriously, I love that crap.
Inner bearing packed with grease and the new seal waiting to be put in place on top of it.

Outer bearing packed.  Time to put the drum on.

Both drums installed.
Once I got the drums on, decided to go ahead and put the pinion seal in place.  I checked, re-checked and triple checked the backlash of the differential and pinion.  The marks the pinion makes on the differential gears looked like they should...I hope.  I sprayed paint on a few of the teeth of the differential and then spun the pinion.  The pinion's teeth would remove some of the paint on the differential's teeth.  The pattern looked fairly centered and seemed deep enough, so I did not mess with it.  I also forgot to take pictures of the paint marks.  And of for what it's worth, I placed the bearing caps back into the original positions according to the technical manual.  Tomorrow, I will put some gasket sealer (permatex #2, if you are wondering) on the backing plate and slide a new gasket in place.  Then, it will be time to bolt the cover on and fill'er up...with oil.

And if you were still wondering about the World's Strongest Man competition between Jack and myself, well, Jack ended up winning.  He claimed he could pick up the rear end of a jeep frame.  I decided to call him on a bluff.  He squated down, placed his five year old fingers around the rear crossmember and then stood up...with jeep frame in hand!  I couldn't duplicate the feat.  Now, how the heck am I gonna get that rear axle off of my work bench??!
The winning lift.

Thursday, January 19, 2012

That "F"-ing Rear Axle...

I don't have any of the replacement parts needed to rebuild the axle, so I thought I would go ahead and just clean up the exterior and then separate the hubs, remove the brakes and give the inside of the hubs a little spring cleaning.  It will then make the whole business of replacing oil seals and installing new brakes so much easier and somewhat cleaner.

So, I spent last weekend getting frisky with wire brushes of all different shapes and sizes, as well as various flat headed screwdrivers chiseling mud, grease and downright gunk out of crevices and such.

Before the makeover:  notice the small pile of dirt below from chiseling away with a screwdriver before getting serious.
Now, as a warning to all before scrolling down, let it be known, said and heard that this probably isn't going to be the most glamourous post of this amazing how to build a jeep in a lifetime story.  This is basically being Charlie Brown's friend, Pigpen, on the driveway and cleaning up a big, nasty jeep part.  I do have a lot of pictures (of dirty and clean metal parts) to razzle and dazzle you.  Also, I did uncover a nifty secret that this axle has stowed away beneath layers and layers of crud.  So, if you are down, lets scroll...

I'm going to hit you with my big news, first.  I know, I should have held out until nearer the end, but what the heck...here it is...
This is a close up of the left hand mounting tab of the axle.  It is located above the orange jack stand in the previous picture.
See it??!!  Yes, that is a fancy script "F" mark made by the Henry Ford Company.  In WWII, Ford produced almost as many jeeps as Willys.  The jeep history is very convoluted, but the jist of it is it was an original Bantam design that was then modified by Willys.  Willys could not produce enough jeeps as the military needed during the war, so Ford got a piece of the pie as well as a copy of the blueprints.  Ford then tweeked the design a bit, yet was able to keep all parts interchangeable between the Ford (affectionately known as a GPW) and Willys (MB model) jeeps.  Ford was notorious for stamping all of his products.  I do not know the official reasoning behind this, but one of the many believable rumors is that Ford did not want a defective non-Ford part ever being attributed to coming from his factory.  So, like writing my 5 year old's name in all of his clothing, Ford stamped various versions of "F's" on most of his parts.  As the war progressed, he toned it down somewhat, but they are still plentiful.  When I restored my first jeep, which is a GPW, I became very addicted to finding the F's on all of its parts.  It is something most people with a Ford jeep will end up doing, no matter how hard they try to resist.

Needless to say, when I found this tiny little script F mark, I became extremly excited.  Yes, this does mean that this axle is NOT original to this jeep since it is a Willys MB model, but me being a GPW guy, I love it!
Brake drum covered in history.

Same brake drum after a lot of elbow grease and a wire brush gave it a what for.

Same brake drum as in the previous picture.  If you turn your head to the side, you can see another "F" mark.

And another "F" mark.

And yet, another, Ford mark.  The manual states that GP 1125 is a Drum, Brake, 9".  Just a little fun fact for you. 

I just had to step back and admire.  Here is my view.

Axle is primed.

I tried to get artistic with this shot.  There is also another GP mark that the brightness of the sun is hiding.

This drum is on the driver's side and it would spin freely. The opposite passenger's side drum had some sort of bind and would more often than not be quite difficult to turn. So, I opted for tackling the easier side first and leave the more difficult (passenger side) for Sunday's work. I removed the nuts that hold the axle shaft in place and pulled it out, which in turn gave me access to the oversized nut that keeps the bearings and more importantly, the hub in place. Inside, I was greeted by some really nasty old Greasy Bob grease.
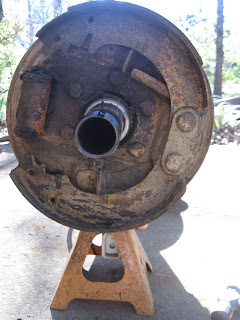
Here is what greeted me:  two brake shoes (the crescent shaped pieces held by two large adjusting screws on the right hand side.  On the left hand side, you can see the original Wagner wheel cylinder.  Rebuild kits are available for these units, but I am opting to replace it entirely with a new cylinder.

Brake shoes and wheel cylinder removed.

So much for my cleanliness.  The hub is off and the interior brake backing plate is exposed.  Two nasty brake shoes are resting on the driveway.  Those brakes are known to contain asbestos:  not good in so many ways.

I carefully cleaned out the hub and the brake backing plate so as to minimalize any dust particles going airborne.  I taped off the center hole for the seals and bearings in the hub as well as the sides where the brakes will press against and primed the remaining exposed metal.  I also removed the brake backing plate from the axle and primed it, too.  While everything was disassembled, I ran all of the nuts and bolts through my wire brush spinning wheel and then rethreaded and tapped them all so as to make the installation so much easier.
When everythig is installed, these gorgeous little bolts will never be seen.  They are used to hold the brake backing plate to the axle, but the "F" marked heads are inside the hub and the nuts are on the outside.

This is the original oil seal.  At the top, you can clearly see Henry's script "F".
Unfortunately, this is one of the parts slated to be removed and replaced with a modern seal.  I'm going to try my best to remove it without destroying it.  I think it is a small, but unique, piece of history.

A close up of the previous seal.

Same seal.  Just more beauty in the details.

Interior of the brake backing plate cleaned, primed, and reinstalled.  In an effort to keep dirt and crud out of the area where the axle shaft sits, I placed a wadded up paper towel.

The following day, I did the same process to the other side of the axle.  Everything was pretty much a repeat except for trying to separate the hub from the backing plate.  For some reason, the brake shoes had expanded and were stopping the hub from spinning.  I struggled and struggled trying to separate them.  I couldn't do it.  I thought, perhaps, that it might be easier to separate them if I removed the backing plate from the axle thus giving each piece room to move away from the other.  I thought it was a genius thought...it was so genius that it reaked of ingenius.  Kind of like the Three Amigos, it is infamous and more than genius.  Well, often what appears to be perfect iin theory fails to develop in reality.  At first I didn't see any immediate positive results.  I think at the peak of my insanity, I had three flat head screwdrivers wedged in various sides along with my Fu-Bar.  In the end, I removed the two nuts from the two large bolts that hold the brake shoes to the backing plate.  These are the two biggest bolts you see on the right hand side of the above picture.  I then tapped them into the hub, thus releasing the brake shoes.  Then, the hub ceased its resistance and finally separated.  I'll have to remember that one for next time.  After that, it was business as usual and I repeated everything that I did from the other hub.
This is the cleaned up backing plate for the passenger side.
 Afterwards, I fitted the cleaned up hubs back on, minus the old brake shoes.  Again, this is something that I have ordered and will replace.  The axle shaft went back in and everything was tightened up, but maybe not in that order.

And then I got curious to see what was inside the differential, or what I sometimes call the pumpkin in the middle of the axle.  I needed to look inside for any broken, chipped or pitted gears and teeth so I could figure out what parts needed to be ordered.  On one hand, I didn't want to look because then I would know.  Like that reasoning makes any sense at all!?   Anyhow, I removed and cleaned all of the bolts that hold the cover plate in place and peaked inside.  Miraculously, everything looked really good...at least for what I could see.  I spun the pinion gear for awhile and watched all of the gears rotate.  It looked very similiar to the inside of a clock.  Everything seemed to be well in order, which was a welcomed relief!
Cover off and looking in...

...and finding more "F's" and GP marks!  Can you see the tiny script F's left and right on the small clips between the bolts? 

This one is on the inside of the cover plate.
Satisfied with what I found, I reinstalled the cover plate.  The last thing I did was to then loosen both the oil filler bolt and the oil drain bolt.  Now, all I can do is sit back and wait for the new wheel cylinders, brake shoes, seals and gaskets to arrive.

Tuesday, January 17, 2012

The Rear Springs Have Sprung

I began with the rear passenger side leaf spring first.  It just happened to be the one I reached for first.

Removed from the frame. 
The blue tape is my high tech filing system so I can remember which side of the jeep this came from.
The is a bolt that travels through the center of all of the springs.  This guy looked bad...really bad...but I went ahead and juiced it up with some penetrating oil to see if I could break it free.  I had little expectations and break free it did...broke right in two!  If puny me only had to exert a partial bit of my strength and it broke, then I figure it shouldn't be on the jeep.  I separated the leafs taking particular attention to the order and direction they were taken off so I could assemble them identically.
This end up!  ...and soon to be the end of its rustiness.
I took each leaf spring to the bench grinder and slowly worked the wire brush across all edges.  The longer leafs were privileged to be attacked by my hand grinder (which worked much faster!)  I sprayed and wiped them down with a rust conversion chemical and once dry, I primed them.  Once the primer dried, I sprayed them down with a Rustoleum green that was loitering around my garage.  It is not the correct green, but since it will be wedged between the leafs and hopefully never seen again, it will do just fine.   Once everything is assembled, I will paint it the correct shade of OD (olive drab) green.
Painted!

Compare and contrast with the unfinished driver's side, but try and not notice that I reassembled it backwards. 
Oooops.  Redo.

My replacement bolt is about 1/2" too long.  Easy enough fix, though.

Driver's side leaf spring disassembled, rust knocked off and patiently waiting while the chemical dries.
Each spring has four tabs that are systematically spaced across each leaf spring.  The driver's side has lost one and I will fabricate my own since I have not been successful in finding a source for a replacement.
The new tab measured, cut and pre-bent.

Test fitting:  not too shabby.  I decided to roll with it.
After test fitting, I removed it to do one more modification prior to painting.  At the base of the small tongue-shaped tab that is sticking out at the top of the above picture, I welded a ball shaped bead to the underside of the strap.  There is a hole in the leaf spring that the bead will fit into and this will help keep the strap secured to the spring and deter its loosening and sliding off.  The original tabs also had this raised bump.  However, I do not know how they manufactured these gizmos back in 1944.  Satisfied, I then painted.

I wedged the section of the leaf spring that had the new tab between two pieces of hard wood and secured it tightly in a vice so the sides of the new tab could not bow out.  I then (with utmost precision) beat the vertical parts of the tab (that are visible in the above picture) over the top of the leaf spring and then carefully tapped the tongue back across the open tab.  I realize that my words make absolutely no sense, so please refer to the picture below for a better explanation! 
The new clip is installed and is very snug across all four sides of the leaf spring. 
The new clip is on the left and an original clip is on the right hand side of the picture.

Nothing new in this picture.  I just wanted everyone to see David Dement's generator in the background that I have not fixed...yet.  He said not to let it take precedence over jeep work.  Honestly, he did.
 Both rear leaf springs are almost finished and ready to be reinstalled.  There is a bushing, or truthfully, the remains of a bushing in one of the eyelets (the round ends of the leaf springs) on each leaf spring.  Both of these bushings have worn themselves beyond suitable use.  The new bushings have been ordered, but I am unsure of there arrival date.  I just need to remove the old and push in the new.  Knowing me and knowing old jeeps, it will prove to be A LOT more difficult than how I have just explained, though.  Until then, keep your eyes peeled for the next chapter...I have already been busy cleaning up the rear axle.  Wow, how can you hardly wait?