Tuesday, September 27, 2011

Bodies, Fenders, Hoods..OH, MY!

I'm not sure where I left off before.  I guess I COULD actually read one of these blogs to catch up.  Instead, I think I'm going to wing it. 

I have determned that the last jeep I dragged home IS a USMC converted radio jeep.  Or, in truth, it was a radio jeep of some sort.  The Marines converted it from a WWII model to the radio configuration around 1947.  The clues were there; this super sleuth just had to uncover them!  So I am on the fence for what type of restoration I am going to do on it.  WWII Army, WWII Marines, post war Marines?  Opinions welcome.

I finally got the piece installed on the floor beneath the passenger seat of the first jeep.  It is very obvious that it is a replacement patch.  Not so much because of my inadequate welding skills, but because of the newness of the steel in a sea of 70 year old, pitted and weathered floor!  Nonetheless, I got it in and primed  90% of the floor and most of the insides of the tub.  Not bad.  There are at least three more places that need attention, but I will get to those when I take the tub off.  The hat channels on the underside need bits and pieces fixed and it will be easier to do the rest with the tub upside down.  And for the record, I have not forgotten about the rear panel.  It is just easier to move around the inside of the tub without it at the moment.

Half full or half empty?  Let's discuss.

Mostly done.  The areas still needing attention can easily be identified.
Today, I got busy on the passenger fender.  It was already off so I thought, "What the heck."  The paint came of easily with the gentle coaxing of the hand-held grinder and then I sprayed the trusty rusty remover chemical across it.  There are a few hairline cracks that need to be hit up with the welder and one mounting tab needs to be made and welded on.  It is one of the small tabs that bolts the fender to the frame.  It is very common for those suckers to rust away and busticate off.  On a side note, I got a call from a fellow jeeper, Jeff, after I had called it quits for the day.  I didn't say a thing about what I had been doing and he said, "Put the grinder down.  I've got a questino for you."  I guess I'm that obvious.

Passenger fender all cleaned.  Check out the crazy drawing in the foreground.  No, Jack was not playing with chalk and it is not part of the famous larger than life chalk drawings in southern England.  The grinder vibrated out of my hands and went to town beneath the fender when I was working on it. With a cool mind and a calm hand, I just unplugged the runaway; this ain't my first rodeo.   Shhh, don't mention this to Sarah-she doesn't like it when I endanger myself while working on these things-so let's just keep this on the QT.

I did not take a 'before" picture of the passenger fender so I took this one of the driver's side.  Condition is quite comparable.  Note the pipe on the fender.  It is sometimes the accomplice of the BFH.  I use it as a leverage bar to loosen stubborn nuts.  It is big enough to tackle tough ones and small enough to fit in tight spots.  Is that what she said?
After the fender, I was still trolling for some garage action.  The hood was looking mighty fine to my eye.  However, before I could get some hood action, I had to play with the windshield.  It tried to resist my charms, but I managed to remove it entirely from the jeep.  Now nothing could stop me from the hood. 

Three of the five bolts were still secured and one of the bolts still had the radio suppression bonding strap!  Exciting, indeed.  I squirted the lube oil all over them and then got the wrenches out.  The bolt with the bonding strap practically jumped out.  One bolt has been weathered to the point that the #11 metric socket fit it best.  Odd, but I went with it.  And the last bolt...well, Bubba was challenging me, and I wasn't quite prepared for the extent of the damage that he had inflicted.  What an evil game of chess you play, sir.

Let's digress and discuss Herr Bubba.  Bubba is the arch enemy of any jeep restorer.  Bubba arms himself with wrenches, hammers, spare bits of iron and steel, aftermarket products, welders and sometimes metal cutting torches.  He prides himself in transforming a perfectly good, stock WWII jeep into something sinsister and goofy looking.  And more often than not, he succedes.  Enter the jeep restorer, who must undo so much of the artistic mockery that has taken Bubba years and years and years to perform. 

Today, I found Bubba's signature along the hinge of the hood.  At some point in time, two of the bolts either came out and/or the threads became stripped.  Bubba had one of his most destructive tools at hand: the welder.  Instead of making a proper repair, he hastily welded the left hand third of the hinge to the cowl.  "Look, Ma, no bolts needed!" 

Armed with my cleverness (which often isn't enough!) I had to use a hammer, a chisel, the cut-off grinder, a cordless drill, a screwdriver and a FUBAR to remove the hood.  But remove it I did...and with minimal damage, I might add!  In the end, the hinge was kind of messed up, too, which is probably why Bubba felt the welder was his best and easiest option.  I shall fix it, though!  And that's where I left off today.

Just a good pic of the work area.  Various tools of the trade are scattered about.   


The two holes on the left (between the hammer head and glove) were where all the Bubbafied welding occurred.
I can't remember if I posted this picture or not, but it was taken last Saturday morning.  My neighbors probably think that Bubba, himself, lives here.  Not Bubba...just me!  However, in their heads, there probably isn't much difference.  
Four jeeps!  One for each of us.
And I have I mentioned how MUCH I love Sarah?  Now would be a good time to do so.  I love Sarah...A LOT!

Saturday, September 24, 2011

On The Road Again

Friday morning, EARLY FRIDAY morning, I was on the road again with a town near Greensboro, NC plugged into my GPS.  It was 4:20am.  If I did this right, I would be home within 12 hours.  When I left town, it was obviously dark and a bit of misty rain was falling.  My mom was a brave soul and reluctantly rode shotgun for the trip.  Her promise was to sit quietly in the back and fall asleep.  She did neither.  The ride was relatively uneventful until the NC border approached and the misty rain turned into bonafide raindrops which then quickly morphed into a hardcore storm and lots of hydroplaning transpired.  Without a doubt, I became a bit concerned and stressed.  I had passed the halfway point and I was determined to come home with a jeep.  I think the epicenter of the storm was in Greensboro.  Lucky me. 

My original intention was to bring home the most dilapidated jeep.  The second most dilapidated jeep sat beneath a lean-to, so for the luxury of remaining somewhat dry during the loading period, I opted for it.  We pushed the jeep to the rear portion of the barn so I could back the trailer beneath the roof.  Let me clarify here that "we" is not my mother and me, but instead the previous owner of said dilapidated jeeps who was more than happy to lend a hand in order to see these gorgeous rustbuckets taken away.  The money I put in his pocket helped, too.

Loaded, strapped and secured and on the way home- all completed in about 45 minutes.  We detoured in Ashboro, NC for a quick antique shopping spree and then headed for home.  I pulled into the driveway at 4:40pm and had it unloaded a short time later.  At this point, I would like to give my wife some serious props.  I had one flat tire on the jeep...the rubber looked like it could have been original and it had about a 12" rip-more like a blowout- across the sidewall.  She recommended inflating it for ease of pushing it off the trailer.  I noted to her the massive sidewall rupture, BUT, to appease her, I reluctantly went to the garage for the air compressor.  I pumped it up...it seemed to be holding air.


The massive tire rip with the tube still holding air!
We easily rolled it off the trailer.  It rolled almost too well, stopping a mere foot in front of the M37.  Do not fret, David.  Sarah, in heels and all, chased the runaway down, grabbing the tub and slowing its roll.  My mom thought that Sarah was stuck to the jeep, hence the running.  I watched the entire scene unfold from my perch atop of the trailer.  And, when I went to clean out the jeep this morning...the tire was still holding air.  Can't beat those 1944 American-made rubber tubes.


Some of the rust that fell off the jeep during the transport.  When I first noticed the pile, I had stopped for gas and did a walkabout to inspect all of the tie-downs.  The pile was at least three times as large and contained a few bolts. Whenever I drove over a bump, the rust just kept falling.  Some might frown upon this, but I look at it as everything that now remains on the jeep must be "somewhat" solid!

Pre clean out.  Reminds me of a junk yard mating with a compost pile.

Possible rat nest...only 1 of 3.

The heart of the beast...not looking so good.  One might recommend a heart transplant.

The Clean Out

I spent Saturday morning cleaning out the dirt, leaves and other assorted junk that somehow accumulated inside the tub for who knows how many years.  The highlights of the unexpected treasures are three different rat nests, 2 eaten ears of corn, tons of nails, and two sprinkler heads.  The real goodies were buried beneath that other stuff:  the parking brake handle, two glove box locks, lots of "good, orginal" bolts, a few bonding straps, a matchbook confirming its civilian life at a Myrtle Beach resort and an extra transfer case.  While I was rooting through the compost pile within the jeep, my neighbor came over to see what was going on.  He was shocked and completely amazed at the joy on my face.  And then he stood in total disbelief when he learned that I paid somebody for this...stuff.  One man's junk...


A good look at all of the "treasures" buried beneath the compost!
I gave it a good cleaning and boxed up the extra parts.  A good cleaning at this point is sweeping up the dirt and leaves so I could see what I was working with.  I haven't affixed a date on this jeep yet.  I have determined that the engine is from 1945, but that may or may not be original to the jeep.  The engine has had the pistons bored out once already.  The jeep has a "rotary" style knob for turning lights on, and those were factory installed after June of 1944.  I might dig around tomorrow to locate the tub's serial number and that should nail down a month and year for me since the frame tag and glove box serial numbers are gone.  The underside of the jeep has a professional-looking rubber coating that has covered up the tub's serial number.  The coating has not gone over the original wire harness.  This does not look like the work of Bubba.  I've heard that sometimes the Marines did this to their vehicles.  Perhaps the few and the proud did this?


Suspect view:  PROFILE

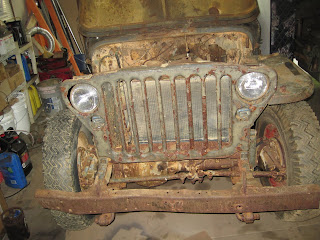
Suspect view:  FRONT.  Note the two black eyes, but it appears to be grinning.  Must be some life left in 'im...somewhere.

Suspect view:  REAR.  Could be a good candidate for some "rusteez" from the movie Cars. 

Jeep #1 Progress

After everyone went to nap today, I drifted to the garage to do some more cutting and welding on the first jeep's tub.  I went to town on the rest of the small areas that are along the floor and walls by the rear panel.  Nothing new, just the same old, same old.  The last two pieces were my favorite since I had to do a couple of small side bends on them and they ended up fitting next to each other; one was the floor and the other was the adjoining wall.


Passenger side, rear corner of the floor.

Floor corner set in next to the already welded in side piece.

Boo-yow.

The Maestro and his magic wand.  Only burnt my feet once or twice with the sparks. 
Thats what I get for wandering into the garage without a pre-empted strike in mind.


Thursday, September 22, 2011

A Little Less Conversation, A Little More Action Please

Yesterday morning, I was looking for an easy, simple fix since Nora had yet to awaken and I was technically on "baby sitting" duty.  I found my spot to be behind the driver's seat along the bottom portion of the rear wheel well.  All I needed to do was remove a rectangle of nastiness that was about 4" x 8", fabricate a small bend about 3/4" from the bottom and running parallel to its length.  Easy peasy, right?  Let's give it a go, shall we?

"Nasty," 'Nuff said.
It is becoming quite routine by now.  Grabbed the ruler, marked off the areas to be removed, and then transferred it to a piece of cardboard.  Have I mentioned that discarded cereal boxes make great template material?  They are thick enough to hold the desired shape, but flimsy enough to bend and mold into various areas...very similiar to the composition of my brain.   I cut out my cardboard shape and then compared it to the rectangle on the jeep.  A wise man once told me a snug fit "is like socks on a rooster."  This looked good, as good as stiletto heels on a hen, so I cut the area out.


Trim off the fat by cutting out the middle man.
I traced around the cardboard on a scrap piece of steel and then cut it out.  Without the small bend on the bottom seam, I fit it into the gaping hole in the wheel well.  Snug.  Since I haven't had too much success since my initial use of the bending brake, I just slapped my piece of steel into a vice and used the BFH to tap, tap, tappity tap a tap dance down on it to get my bend across the bottom.  Again, back to the jeep...and it was fitting even snugger.  So, I figured lets just tack it in and go get the girl.  Like always, my simple tack turned into the full bore weld and before I knew it, I had it all in place.  I haven't grinded it down, yet, though.  I had exercised at least that much self control.  And to know me is to know that I pretty much do not exercise.

Webster's Picture Dictionary defines this as "socks on a rooster."
Today, I was jonesing for something simple and little so as not to get too involved and too dirty.  Yes, I have seen this jeep and know that the odds of not getting dirty are VERY non-existant.  I tried, though, and subsequently failed.  Go big or go home.  I thought I'd go ahead and cut out the gross spot beneath the passenger seat.  It would be a nice big rectangle (16" x 5") on a wide open flat plane.  I marked out the area to be removed and made my cardboard cutout.  It seemed to have a nice fit, too.  So, next step is to trace it on some steel.  Well, my supply line failed me.  I have plenty of steel, but none big enough for one piece in that area!  So, that project goes on hold.

I moved around to the rear of the jeep and scoped out what damage I could inflict there.  I still had Bubba's weld lines along four edges from when I removed the rear panel.  Sooner or later those would have to be removed.  So, lets go ahead and do that unpleasant, unglamourous job now.  And, my trying to stay reasonably clean goal just got grinded away.  It wasn't the most fulfilling job to do on the jeep, but it does look better with those nasty weld scars gone.  It will be easier to fit the rear panel back on when the time comes.

Okay, its still early in the day.  Next job?  There were all of those small rust-through areas along the tool box walls and floor near where the rear panel was removed.  I decided to replace the corner section on the driver's side.


New corner piece (on the right) sitting beside its soon to be new home.
I had to do a little bit of touching up with the grinding disc along the cut-out area as well as some nip and tucks on the fabricated piece with the bench grinder to make them agree with one another.  However, it did not take much to get another snug enough fit to make it work.

New corner piece dropped in and very snug.
Once in place, it was only logical to break out the welder and make it permanent.  Being so small, it didn't take long to weld it.  In the back of the jeep sat my grinder with the right disc on it, so it only made perfect sense to go ahead and grind away the Frankenstein scar.  Minutes later I was done...for the day.
New corner piece welded in place with Frankenstein's weld marks grinded away.
Tomorrow I get to go bring home jeep number two.  I haven't yet made up my mind as to which one to load.  That must mean I am anxious to get them both!  I'll be leaving stupid early in the morning and driving time is just about an even 10 hours there and back.  If all goes well, I'll be home before dinner and soccer practice.

Here is your parting shot:  the BFH next to the tiny new corner piece.


Monday, September 19, 2011

Second Verse, Same as the First (except on the opposite side)

With the driver's side of the tub basically finished, it was time to wreck some havoc and destruction on the passenger side.  And that I accomplished.  Things got really messy before they were able to get cleaned up, but that is pretty much understood through all of the facets of life.

If anyone had been watching me, they would certainly have thought  that I had lost my mind.  I am fairly confident that I just stood and stared at the side of the rusticated jeep for an indefinite period of time.  What seemed like hours was probably only 15 minutes or so.  I was planning and plotting my attack.  The areas of weakness (codeword for nasty rusty areas) ran in three different zones.  The largest area was within the perimeter of the cowl step and vertically above it.  It also had a long finger protruding horizontally towards the rear along the bottom edge of the tub.


Rusticated area #1 (along the cowl step) and area #2 (the vertical edge at the seams)
The next bad area was where panels overlapped each other below the doorway. 

And the third area was along the bottom edge near the corner by the rear tire.  It is also directly below where the radio suppression unit would sit behind the passenger seat.  I actually had to cut out one of the bolt holes.  I can't believe that after all of the holes I filled in, I will now have to drill a new one!

Rustication #3 (corner just in front of rear wheel well)- already cut out and fabricated replacement panel ready to get in the game. 
For my warm up, I began with rusticated area #3.  All went smoothly.  Or actually because of my welding skills, it was put in rather roughly.

I cut out areas number 2 and 3 hoping it would give me a better idea of a plan of attack.  When that better idea failed to appear, I went ahead with my original plan.  The long extending horizontal finger from the cowl step seemed like it would take a major miracle to fit it in with one piece that would include the floor of the cowl step and the wall of the tub.  So, I took three areas of rust and made a fourth.  I did that bottom edge finger fairly quickly.  I then decided to put in the pieces at the vertical seam, starting with the panel that would be in the rear.  It was difficult, but I and my opposable thumbs prevailed...with the help of a grinder.  With the rear portion in place, the front steel plate had a better defined home and slid in there.   Tack, tack, tack...all corners in place.  I didn't have a piece of steel big enough for the cousin of last week's Lazy Texas, so I went ahead and welded in all of the seams to the other pieces.  And for the evening's fun, a trip to Lowes was in the plans.  And for those who will not be named, but were offended by the Lazy Texas comment, this cowl step area looks more like the proud state of Texas that was just defeated at the Alamo.

Sunday morning I woke up bright eyed and chipper and ran to the garage at 7:00am with thoughts of sugar plums, Rosie the Riveter and fabricating a magnificent panel in my head.  Well, my Ipod ran out of juice and that set an evil tone.  Evidently, I can handle frustration and misery so much better with music.  All in all, it was an epic two hour battle, but in the end, I made my piece (or perhaps peace) and got it to fit somewhat reasonably.  I came inside for some coffee and found Sarah and Jack hanging out.  I told Sarah it was in, but I feared actually tacking it in place because "what if it didn't really fit when I got to the last side??"  Her reply: "Then just cut it out, again."  Good enough.  What a pep talk.  Out I ran...with my newly charged Ipod.

I got new panel secured with several welds and it all looked fairly good...except for one area near the crease.  My good steel was riding a bit high and I couldn't get the old steel to raise up.  I looked and looked and then...voila!...where is my BFH?  I found the hammer and beat it down.  I'm not going to disclose exactly where the two edges failed to meet, but I will say after a couple of swats with the hammer, it now looks perfect.  Since this doctor does not have a nurse, I went ahead and closed the patient up my self. 

All zones of weakness conquered!  They just need to be smoothed down now.
I went inside to get cleaned up and take a break.  After the big family expedition to Publix was over, I went back out to clean the welds up.  All and all, I was very pleased with how it all turned out...except for the vertical seam (seen in the middle of the picture, above).  There were some areas throughout all of it that I had to touch back up with the welder and then smooth out, but I just couldn't get the vertical seam to come out "pretty".  I ended up having to mix up a small batch of body filler and scrape in some of the uneven areas and then sand it down.  And I still don't like it!!  I'm sure I will be revisiting that area again.
Smoothed and primed

A closeup of the cowl step (pretty...almost too pretty) and the vertical seam (hmmm).
And, for a finale, how about a prelude of what's to come?  I couldn't resist myself.  I slapped on my cut-off discs and went to town on the the rear panel.  That guy has had a bum life...one piece and looking good when driving away, then Bubbafied to a tailgate, and finally half-heartily stuck back on as a permanent rear panel...and has lost a bit of its steel, along with its pride in the process.  Well, like I said earlier, I tend to make a mess before I make it look nice again...

Now you see it...

...and now you don't!  Note the pieces of post war angle iron removed, too!

Tune in next time to see how this riveting (that was a pun, no rivets here...yet) chapter will unfold.  Until then, from the Motor Pool...


...Keep 'Em Rolling!  (push them if you have to.)

Friday, September 16, 2011

Time to Grind

We got started WAY to early today.  Jack was out of bed hours before the crack of dawn and decided to set up camp underneath our bed.  Long story short, he managed to wake Sarah and myself up for good at 6:00am.  Since we had TONS of time to kill before school, I went to the garage to assess and plan.

My plan quickly formed and before I knew it, I was cutting on the cereal box again and sketching on the jeep tub.  This time, my area of attack would occur directly below the axe sheath in three small areas.  It did not take long to get the dimensions right on the cardboard, then transfered to the tub and then onto suitable pieces of steel.  At first I thought that that would be a good enough start, so I went back inside to check on everyone.  The agitations had subsided slightly and nobody was crying...yet.  So, back to the garage.

Picasso at work again

I thought, "Gee, maybe I'll just cut out the rectangles in my replacement patches."  Clamped 'em down and quickly got the cut-off wheel spinning.  I cleaned up the edges on the wire wheel and admired my work.  So then I figured since that chapter went really fast that I still had time to cut out the areas on the tub.  Those cuts went as expected and without any disappointing surprises.  The horizontal line just beneath the sheath proved the trickiest since my cut-off disc was getting smaller in diameter.  I was able to get all three rectangles "close enough" to then pry them off with the gentle persuasion of a screw driver followed by the snug tug of the pliers.  I filed the edges down, paying particular attention in the corners and then did a cleanup lap with the dremel tool.


Mind the Gap...before the cleanup lap

The test fit for all three pieces was close, very close, but I still needed to trim a bit off of each of them.  I placed them in their respective holes and then outlined the overlapping areas with the sharpie.  They were all small enough edges that needed to be removed that I could take each one to the grinding wheel for the trimming.  Perfect!

Again, I figured I was way ahead of the game this morning and knew I had to be pressing my luck.  I ventured back inside and things seemed to be progressing about as well as could be expected.  I refilled Sarah's coffee, stripped Jack's urine covered bedding and got the laundry started.  Yep, this Domestic Goddess can almost do it all.  After asking Sarah twice what else I could do to assist, she had nothing, so back to the garage...maybe I'll just tack weld each of the pieces in so I'll be ready to go full steam ahead later.

12 corners tacked and in place.   Looks good, let's start on the edges.  Just as I finish welding in the third piece, Jack opens the door and says its time for school.  He strolls out and informs me that I have a great looking nasty old jeep.  Sarah comes out and says it smells like something is burning.  Well, I've been welding, so more than likely my skin, clothes and shoes are singed or still burning.  They pile into the car, Nora is still sleeping, so I go and take a look at that lazy state of Texas from yesterday.  Might as well finish that guy up while I have the equipment at the ready.  And now, its time to grind!  ...but maybe this afternoon...I've got a few more domestic duties to take care of.


Three for three welded

And a look at both areas.  Lazy Texas on the lower left and the threesome on the lower right patiently waiting for the grinder


Thursday, September 15, 2011

Deep in the Heart of Texas

All week long I have been slowly welding the 50+ large and small holes in the tub that Bubba and the gang dilligently drilled throughout the 60 years of its civilian life.  I've got them completed on both sides, but I haven't even looked at the rear panel with the imposter tailgate perpetrating.  Seriously, every time I walk around the jeep, I close my eyes so I can't see that destruction.  I guess that isn't entirely true.  I do sneak a peak at it so I can start "fixing it in my mind" before I actually take my tools to it.  I guess if I would have approached golf with the same mental vigor, I would have been better.  Or I just would have watched my golf balls splash in the water or bounce out of bounds in my mind's eye before actually hitting it where I shouldn't have.  I have found out that I do like to spin things over very thoroughly mentally before I go and begin attempting a repair.  I like to see it completed in my head before doing it in reality.  No "John Wayne-ing" with cut off discs and grinders here! 

So I have got all of the holes filled.  What remains, now, are the serious rust-through zones.  The driver's side has three spots that need to be repaired, the worst one being an angled area around the cowl step.  So, no reason to ease into the mess and begin with the smaller business card size, flat spots.  Let's tackle the hardest part first.  Why, not?  

 I examined the area and decided that I really wanted to make the repair with one piece.  I thought in the long run it would be stronger and hopefully look neater not having to weld a seam in the 90 degree area.  The truth is, there are either great welders or great grinders in the world...or so some would say.  I am neither.  I'm mediocre, at best, in both categories...unless its a nice wide open flat spot and I can get it nice and smoooooth.

I took my trusty old dull, black sharpie and sketched out  on an old cereal box a shape that resembled a deformed, lazy looking Texas sitting in a Lazy Boy.  I cut out the shape and positioned it on the side of the jeep and then trimmed it as necessary.  Once satisfied, I then traced it with the sharpie and stood back to admire my modernesque Picasso skills.

Picassoesque sketchwork

Not bad.  Let's do this.  I rummaged through my box of leftovers and found a suitable piece of steel left over from my M37 body work.  After cutting it out I eyeballed it and the area awaiting the repair.  Satisfied that I would be close enough, I then cut out the rusty area on the jeep. 

I took my newly formed piece of good steel, set it up securely in the brake press and bent the piece of steel into a 90 degree position.  Not that it ever works out right the first time, one always hopes...but, it didn't quite fit.  About an hour later of trimming a bit off here, a little off the top there, a smidge on on this side and a tad on that side with the grinder, file and cut-off wheel, the lazy shape of Texas finally got a decent fit.  I couldn't get my clamps out fast enough.

Out with the old and in with the new

This would be the old

I got everything set up in a suitable position and then I spot welded it into place.  My time ran out, so it was a good stopping point to clean everything (including me) up.  Jack asked me twice, "Daddy, is that oil on your face?"  No, just tons of dirt, grime and charred bits of metal, I guess.  Nonetheless, I feel overly joyous knowing that I've got the toughest part of the driver's side basically done.  Of course, with THAT being said, the two business card flat spots will become overly complicated!  No rain on this parade...I'm rejoicing in the now.

Clamped and ready

My own brand of spot welding...it'll get finished and cleaned later.


Sunday, September 11, 2011

Let the derustification begin!

Well, I took the plunge today.  And honestly, I am very surprised it took me this long to jump in and really get dirty on the jeep.  First thing this morning, for my warm-up, I reinstalled the grill on the good jeep and got it back in proper working condition.  Once the in-laws left town, I did my token "pull a couple of weeds out of the flower beds and then excuse myself to the garage to find something."  What I found was a nasty, old jeep begging for some action.  And me, being a man of action, quickly went to work.

After turning on the ipod, I pushed the  jeep into the driveway.  I found my shop fan and strategically placed it to blow down range and directly behind me.  I dug my trusty grinder out of the bottom of the tool bin and attached the wire wheel to it.  That's right, I am now perched upon the cusp of 3500 RPM's of fast paced derustification.  I pulled up a stool, plugged everything in and went to town.  I started just above the driver's side cowl step and very SLOWLY worked my way to the rear corner.  It took about an hour to travel the distance of what, 4 feet?  Progress. 

I squirted some penetrating oil on some of the bolt-ons (handles, trailer socket, spare tire carrier) and then reluctantly pushed the jeep back in.  I cleaned up my mess and wandered inside to a greeting of "Wow, you are wonderfully dirty!"  Off to take a shower and do some grocery shopping.

When we returned home, the kids went to nap and I again grew restless.  Sarah quickly found me aimlessly walking around in the garage looking for something dirty to play with.  Well, once again I pushed the jeep back outside, set up my grinding work station and went to town on the passenger side.  My wire brush was worn almost to a dull nub, but I persevered and cleaned up the length of the passenger side.  There is defintiely more repair work that needs to be done on that side, but that's part of the fun, right?

Afterwards, I cleaned up my mess (including myself...again) and drifited back inside.  The house was still quiet so I went back to the garage.  No, I did not push it out again.  Instead, I grabbed a sharpie and started circling holes that were not installed by the Willys factory in Toledo, OH.  Bubba and the gang drilled at least 48 holes into the drivers side of the jeep tub and possibly a few more than that on the opposite side.  I did not count the holes in the rear of the jeep since I haven't cleaned that up yet.  Where is my welder?  Well, its too late in the day for the welder, so in lieu, I grabbed a few wrenches and removed the rest of the bolt-ons.  Now, I'll have a nice, clean slate to work on next time.  Clean, of course, is a relevant term.

At the end of the day, I've got two shiny sides on the jeep.  If it weren't for the welding repairs, I could prime it down and it would look better.  But, alas, it still needs a wee bit-o-work before anyone (but me) can see an improvement.


Grinding through a dust storm.

Thursday, September 8, 2011

Enough sideline sitting; Put me in Coach

Well, I've organized, labeled and packed away the gazillion take-off parts that came extra with this "Picker's Delight" (my neighbor came up with that catchy catch phrase the other morning).  Lots of boxes lining the wall of my garage, or what Jack and I refer to as our Motor Pool, that will now patiently await their turn to get cleaned up and bolted on.  Well, they will get bolted on if/when I remember that I have them when the time comes to use them.

So today, I finally got tired of patiently walking around the jeep studying it from every angle, similiar to how a football coach paces the sidelines watching, analyzing, applauding and occassionally cursing.  So, I did the only logical thing I could think of while trying to remain somewhat clean...and practical since both kids were napping and at any second could wake up and spoil my monkey wrenching time...I decided to take the driver's seat out so I could get a good look at the gas tank and sump tank. 

Well, fortunately, only one bolt was keeping the seat in, but that one bolt decided to be stubborn!  I squirted it with penetrating oil and grabbed my wrench.   The lip of the chair leg was bent and kept me from getting a good grip with the wrench (1/2" wrench for the Curious Georges).  So, I used a hammer to beat the lip down.  The only thing that moved was about a pound of dried-up mud from the underside of the jeep.  The floor of the garage looked like a giant had demolished an adobe village.  I got tired of the dust storm, so I quit hammering.  I tried to get the bottom of the screw with my vice grips from the underside, but that was a no-go.  Fine, bitch, I will drill you out.  I quickly grew bored with this procedure and went to look for my BFH...Big F-ing Hammer.  The BFH flattened the lip of the chair and then I slapped the socket wrench on it, used my pipe for leverage and DISCO, Bobo's dancing!  I'm not going to lie and tell you that the thought DID NOT cross my mind that this was going to be a sign of how stubborn this jeep is going to be.  Seriously, I had to work that hard for one lousy screw??   That's what she said!

Out comes the chair and then the two straps holding the tank in were easy-peasy.  I crawled under the jeep and just cut the old fuel line (that Bubba obviously installed some time ago) and then pulled the gas tank out.  There was so much dirt and leaves between the tank and sump well that I filled a plastic grocery bag to about 2/3 full.  Wow.

I took the tank out to the driveway and attacked it with my broom.  When the dust storm settled, I ended up finding a small pinhole in the bottom of the tank.  Although a bit disappointed, I wasn't surprised since seeing all that stuff it has been sitting in/on and who knows for how many years.  It should clean up fine and it can be repaired.  Pretty rusty inside, too!  It will look all that much better when done.

My thirst for dismantling nasty, rusty crud had yet to be quenched so I went after the passenger seat.  Penetrating oil and then wrenches flying and out comes the chair.  Now I can get a good look at the bad rust through spot. 

It might be because the other jeeps aren't here, but I am kind of jonesing to do the tub's bodywork right now.  There are plenty of spots to go after.  That's for sure, that's for dang sure!

And yes, when done, I put away my tools and swept up the the adobe village ruins.  I am quite confident that I will make more!

Chair out and tons of dirt.


After the clean up. 
I should have tossed the bag of dirt and leaves at the curb so it could pose as yard debris.

Rolling without the seats.

A pleasant view of the worse rust through area below the passenger seat.

Tuesday, September 6, 2011

Assessment

I have only collected and brought home one of the three jeeps.  It is approximately a five hour drive (one way) to where the jeeps are and unfortunately, I only have a trailer that will haul one jeep at a time.  Quick math tells you its about 30 hours, 6 tanks of gas, and a couple of hours to load the jeeps so it is just a logistical nightmare for one person just to get the jeeps back to my house in order to transform my yard into a junkyard.  This sort of dedication is not for the faint of heart.  I keep telling myself it is for the war effort...even if the war ended 66 years ago.  Keep 'em rolling, right?

So one jeep (the supposed "good jeep") is at home and in the garage sitting next to my original project.  The morning after unloading it, I was like a kid on Christmas morning:  up at the crack cleaning and organizing, pulling all of the large parts out of the tub (extra windshields, hoods, fenders, rims) and then sweeping out the interior so a practical assessment could be made.

Overall, it wasn't too bad.  The tub is fairly solid, albeit there are quite a few extra hole purposely drilled into, a tailgate had hastily been cut out of he rear panel and then haphazardly welded back on, and then the typical rust that is expected to be found:  hat channels, drivers side toolbox bottom, beneath the passenger seat (is the worst spot) and a small spot on the driver's seat floor.  I can honestly say that I have seen worse!

There were four boxes of parts and accessories that came home with me, too, but I wasn't able to inventory them due to a committment to retrieve the rest of our household belongings that had been in storage for the last 3 years.  If its been that long, do I really need them at this point?  No, but I had to get them out.   When all of the "stuff" came home, we had nowhere to stick it, so half now sits on my trailer and the rest sits in, on and around the two jeeps in the garage while it waits for the National Kidney Foundation to come and liberate it.  My wife thought it made the jeeps look better with everything piled on.  I am not happy.  At 10:00am, the garage looked like a motorpool.  By 1:00pm, it was a storage unit for junk.

Below are some not so glamourous shots of the jeep in the garage.  These are posted mainly so everyone can pity my wife and give her sympathy.  Seriously, though, it wouldn't look so bad if all that extra "stuff" weren't in the garage!  Trust me.  You might not be able to tell, but the already restored jeep is on the left and the new guy is on the right.  I've removed the grill of my restored one while attempting to pinpoint my pinhole radiator leak.


In two weeks, I am tentatively planning to retrieve jeep number 2, which is the one with the good frame.